

Nobody likes getting a bill that’s several times higher than they were expecting. Nobody likes spending months planning out their next AWS setup and forecasting costs just to find out that they got one detail wrong and their plans are in ruins.
AWS Pricing Calculator is the solution to these problems.
With no commitment required, AWS Pricing Calculator is one of the most powerful (and easy to use) native AWS tools for seeing what your setup would cost you. You don’t even need to have an AWS account to get an idea of what your ideal operations’ bill would look like!
That’s why we’ll be telling you:
- What is AWS Pricing Calculator
- How to use AWS Pricing Calculator
- Pros and cons of AWS Pricing Calculator
- The best way to calculate your AWS costs
Let’s get started.
What is AWS Pricing Calculator

The AWS Pricing Calculator is exactly what you’d expect - it’s a tool that you can use to calculate the rough costs associated with a particular AWS setup. By entering the products, services, and details of those items into the calculator you’ll receive an estimate of how much it’ll cost you to run that setup.
This makes the calculator an invaluable tool for modeling your cloud setup without having to learn everything the hard way (via setting it up and getting an actual bill). It’s especially useful due to being a web-based tool that doesn’t require the user to have an existing AWS account or make any commitments to putting the hypothetical situation into practice.
In other words, you can use it as a playground to project how much a particular setup would cost you. Whether you’re looking to modify your existing infrastructure or you’re investigating different cloud options for an upcoming project, AWS Pricing Calculator lets you do this with no strings attached.
The other main draws of AWS Pricing Calculator are that it allows you to break down your estimate by service, group services to see an overall bill for a section of your operations, and that you can save, share, and export your estimates to share with others.
Breaking your estimates up by service or groups of services lets you see exactly what is costing you the biggest chunk of your bills, and allows you to judge whether the benefits you’d get in return are worth the expense. Or, rather, whether you think that the operations will generate enough value for you to make the costs worthwhile. If you don’t think they are, you can simply go back to your estimate and adjust or remove services until you find something more palatable.

Rounding us out for the explanation of AWS Pricing Calculator is the option to save, share, and export your estimates. This is handy for any time that you don’t want to have to re-enter all of your model’s information to get back to the quote but, more so, it’s a great way to share the estimate and all the details therein with the rest of your team. Whether you’re looking to get approval for the project, you’re keeping your financial team in the know, or you’re looking for input from other developers who could suggest ways to improve the estimate’s accuracy, this is the best way to do it.
There are a few downsides to this tool that we’ll cover in detail later in this post but, for now, just know that you need to remember that all of these figures are estimates based entirely on the data you put into the calculator. If your final setup is different in any way, you discover that you need to change things in order to meet your needs, or the pricing shifts in any way, your estimate will no longer be accurate.
However, before diving into the pros and cons of the tool, you need to know how to use it effectively.
How to use AWS Pricing Calculator
Unlike many other AWS services, AWS Pricing Calculator is blessedly simple to get up and running with. There are a few aspects that require more fine-tuning, but to get a very rough estimate it’s refreshingly easy.
Start by navigating to the pricing calculator and click “Create Estimate”. This will start up the calculator - remember that you don’t need to log into AWS to use the tool, but this also means that leaving this page will result in you losing your estimate.
AWS Pricing Calculator requires you to do two things; select a service, then configure that service. Rinse and repeat until you’ve selected all of the services you’ll require.
So, start by choosing whether to search for your AWS service by location type or by name. Our advice would be to stick to the default option of searching via location type, as this will filter out any services which are unavailable in a particular location. You can browse the full selection of available services without the distraction of items that you won’t be able to access when it comes to actually setting things up. Plus, you can still search for services by name within the results showing for your location, so the only reason to use the overall option of searching by service is if you know exactly what you’ll be using going in, and are certain that the setup will fulfill your needs.
Once you’ve filled in your location details (for our example we’ll be using the AWS Region US East (Ohio)) select the first service to add to your estimate. This is where things get a bit more complicated, as you’ll have to configure the options of the service, so you’ll need to have some idea of what you need before doing this.
Let’s run through an example of adding an EC2 instance.
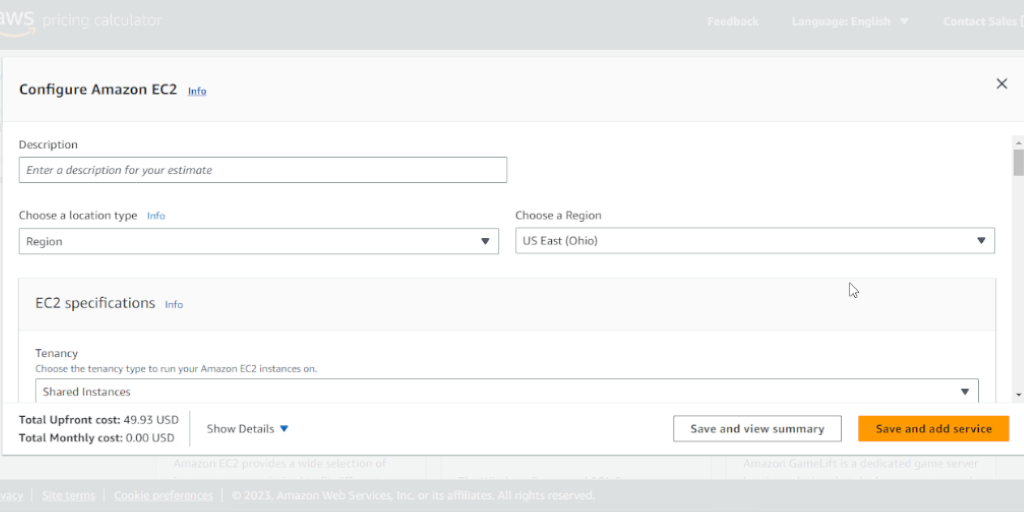
Find EC2 in the services selection and click “Configure”. Fill in a description for your instances (for future reference), check that your location is correct as prices will vary depending on this, and start going through the instance specifications.
You’ll have to select your tenancy type based on whether you require dedicated instances or hosts, or whether shared instances are fine. Then choose the OS and estimate the workload that the instances will be put under. If you’re unsure then it’s safest to go with “constant usage”, but if you know that your traffic is mostly based on daily, weekly, or monthly spikes then go ahead and pick that option instead.
State how many instances you’ll need, and then you’ll come to the most experimental part of this exercise; choosing what type of instance you want to have. As stated in our EC2 instance types post, every instance is designed to suit certain use cases, with differing capabilities and prices accordingly. It’s fine if you’ve only got a rough idea of what you need, because you can always come back and tweak your selections to make your cost estimate more accurate.
For now, we’ll say that we’re looking for 4 t4g.large instances, and next it’s time to select your payment options. This relates back to the various EC2 instance pricing methods available, including Spot Instances (cheaper offerings for low-demand instances), Savings Plans, and so on. Again, for the sake of simplicity we’re going to select On Demand pricing here. It’s the most expensive, but it’s the best option for when you’re not sure how long you’ll be using the instances for (and for seeing the maximum potential cost of your instances).
That’s it for the basics of EC2 instances, but you will also be given the option to set up additional parameters by scrolling down. You will be able to choose from AWS EBS storage, detailed monitoring, data transfer, elastic IPs, and additional placeholder costs such as licensing fees. We’d recommend taking the opportunity to fill in the basics of your EBS storage (assuming that you’ll need it for your instances). In our case, this meant choosing a General Purpose SSD (gp3) with 8,000 IOPS, 500 Mbps throughput and 500 Gbs of storage, with no snapshots.
While we didn’t for this example, it’s well worth trying to get an idea of what your data transfer amounts will be and entering it into the calculator, as data egress is one of the most common hidden costs in AWS and can add a substantial chunk to your bills if you’re not keeping an eye on it.
Once you’re done, click “Save and add service” to finalize your settings and add the service(s) to your estimated bill. In our case, we had an estimate of $516.22 per month or $6,194.64 per year with no upfront costs but remember that we didn’t add any data transfer charges.

After adding your first service it’s just a case of going through the list once more and adding further items until you’ve got everything you need, from instances and storage to load balancers and domain names. Click View Summary to view the final estimate, which will show you the total yearly cost of the services you chose. You can also still edit and remove your selections, and add new services should you wish to.
There are two more features worth considering when you’re getting started with AWS Pricing Calculator, and those are the ability to set a budget and to group your services.
Setting a budget will cause the calculator to offer recommendations for certain services based on the limits of what you’re willing to spend. It’s a quick way to get an idea of what you have access to within a particular price point, and can save you some time if you’re unsure as to the specifics of the services you need.
Groups, meanwhile, allow you to summarize portions of your bill to see how much certain groups of services will cost you. For example, if you’re going to be setting up two products to run via AWS, you could group the services for each of them together to get a sense of what each product will cost as a whole should you stick to your plans.
Pros and cons of AWS Pricing Calculator
Before rounding out, let’s take a look at the pros and cons of using AWS’ native calculator. For the pros, we have:
- It’s a great way to get a rough idea of pricing
- It lets you model a cloud build before putting it into action
- You don’t need an AWS account to use it
- It’s free to use
- You can compare setups to test pricing plans
- Exporting views makes it easy to fire estimates to other parties for approval
- It’s the best way to natively test different setups with no commitment
Most of these are self-explanatory, but we’ll expand on a few points. First off, it’s the best way to natively get an idea of what your setup will cost without taking too long to do or requiring you to have a concrete plan. This is especially useful for getting ballpark figures for upcoming operations so that you can give your financial team (and managers) a very rough idea of your required budget long before any time is spent making it a reality. The earlier you can do that, the less money will be wasted on doomed or unsustainable projects.
Not needing to use an AWS account to access the calculator means that you can estimate the costs associated with an upcoming or hypothetical project, or even changes to your existing setup long before official work on them starts. The same holds true for the tool being free to use - there’s no commitment or cost involved, so you can experiment with different setups to your heart’s content.

When it comes to exporting your estimates, doing so lets you quickly send a full breakdown of costs to your team rather than leaving it at the ballpark figure alone. That way you can get other peoples’ opinions on what needs to be changed to make the calculation more accurate, and justify all of the expenses to relevant parties at the same time with a full breakdown.
However, it’s not all sunshine. AWS Pricing Calculator falls short in the following ways:
- Estimates can go out of date quickly depending on pricing plans
- Estimating is only as good as the information you put in (changing needs, prices, etc)
- There can still be hidden costs
- Not linking your account can leave discounts out of the picture
If you put bad or inaccurate data into the calculator you’re only ever going to get inaccurate cost estimates. There’s no way around this, and no way for the tool to know whether or not your setup will be suitable for your needs (other than the bare minimum of staying within a set budget). So, while the calculator is quick and easy to use, you’ll still need to have reliable information as to what AWS services you’ll need to use and what their specifications will be in order to get any useful information about their price.
Not to mention that hidden costs are still a thing, and AWS is chock full of surprise sinkholes. We mentioned data egress (transfer) costs above, but those are just the most common in a long line of costs that can rack up quickly and are all too easy to forget about when you’re running your operations via AWS, let alone when you’re planning hypothetical setups.
The lack of a linked account will also mean that you could be missing out on discounts that are only available to AWS power users. There’s plenty of opportunity to save money if you’re a heavy service user, but those discounts are only available for those with large accounts. Unless your hypothetical setup is huge (or you enter all of the details of your current setup too) you’ll be left with no way to tell whether or not you could qualify by grouping your old and new accounts.
The best way to calculate your AWS costs
AWS Pricing Calculator is a fantastic tool with relatively few downsides. It’s absolutely your best option for getting a rough idea of the price of a new setup or operation. But what if you need reliability more than unreliable estimates? What if you’re already running AWS services and your budget is stretched to its limits? What if you’re wasting money on services or overpaying for things you don’t need?
That’s why you should pair AWS Pricing Calculator with our tools here at Aimably.
If you need certainty from your current AWS bills so that you know what your budget for future projects will be, our AWS Invoice Management Software has got you covered. Are costs too high for you to have enough to spare on the new project? Our AWS Cost Reduction Assessment will show you exactly how you can save the most money through AWS without affecting your business’ performance.

